for Electrical Component Safety and Compliance 1")
Short Answer: What Is the Glow Wire Test?
The glow wire test is a fire hazard test method used to evaluate how electrical insulating materials, components, and end products respond to abnormal heat. A standardized heated wire is brought into contact with the specimen under controlled temperature, force, time, and movement conditions. The test helps laboratories observe ignition, flame duration, afterglow, molten dripping, and whether surrounding material such as wrapping tissue ignites.
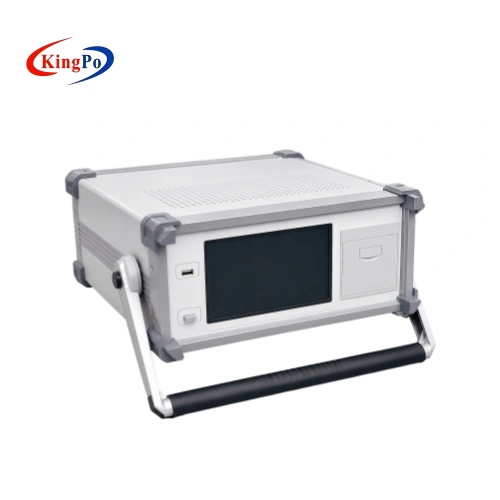
For laboratories working with IEC 60695 series requirements, a reliable glow wire test apparatus should provide stable temperature control, accurate contact force, repeatable specimen movement, precise timing, clear flame observation, safety protection, and traceable calibration support.
Key Takeaways
The glow wire test is used to simulate short-term thermal stress that may occur when electrical parts overheat, fail, or come into contact with surrounding insulating material.
IEC 60695-2-10 defines the common glow-wire apparatus and test procedure, while IEC 60695-2-11, IEC 60695-2-12, and IEC 60695-2-13 address end-product testing, GWFI, and GWIT applications.
The most important equipment selection factors include glow wire temperature stability, contact force accuracy, specimen movement, penetration depth, timing resolution, chamber safety, ventilation, and documentation.
GWFI and GWIT are material performance indicators, while GWEPT is used for end products. Laboratories should confirm the applicable sub-standard before selecting the apparatus configuration.
For certification laboratories and repeated quality control testing, semi-automatic or automatic glow wire test apparatus is usually preferred because it improves repeatability and reduces operator influence.
Testing bodies such as UL, TÜV, SGS, and Intertek may perform or witness tests, but they are not the same as equipment manufacturers. Laboratories should select an apparatus supplier that can provide standard-oriented design, documentation, calibration support, and technical guidance.
What Is a Glow Wire Test?
A glow wire test evaluates the fire hazard behavior of materials and products when exposed to a heated solid element. In real electrical equipment, ignition may occur when a component overheats, a connection becomes loose, a resistor is overloaded, or a current-carrying part transfers heat to nearby insulating material.
The glow wire test recreates this type of fault condition in a controlled laboratory environment. During the test, a nickel-chromium glow wire is heated to a specified temperature and applied to the test specimen for a defined period, usually under a standardized contact force. The operator observes whether the specimen ignites, how long any flame lasts, whether afterglow occurs, and whether molten material or burning particles ignite the wrapping tissue below the specimen.
This method is widely used for electrical and electronic products, household appliances, lighting equipment, switches, connectors, terminal blocks, insulating materials, power supplies, and plastic enclosures.
Why Glow Wire Testing Matters for Electrical Product Safety
Many electrical fires begin with abnormal heat inside a product rather than with an external flame. A poor connection, component failure, overload, or local hot spot may cause surrounding plastic or insulating material to ignite. The glow wire test helps manufacturers and laboratories evaluate whether the material or product design can resist ignition or limit flame propagation under these conditions.
For manufacturers, glow wire testing supports material selection, product design verification, pre-compliance testing, production quality control, and certification preparation.
For testing laboratories, the method provides a repeatable way to evaluate fire hazard behavior under standardized conditions.
For compliance teams, the test results help demonstrate that a product has been assessed against recognized fire hazard test methods used in electrical safety standards.
Which IEC Standards Apply to Glow Wire Testing?
The IEC 60695 series is the main standards family for fire hazard testing of electrotechnical products. For glow-wire based testing, laboratories usually need to understand the relationship between the following parts.
IEC 60695-2-10: Glow-Wire Apparatus and Common Test Procedure
IEC 60695-2-10 defines the glow-wire apparatus and the common test procedure. It describes the standardized electrically heated wire used as the ignition source and provides the common basis for small-scale glow-wire tests.
This part is important when selecting equipment because it relates directly to apparatus construction, glow wire geometry, temperature measurement, contact force, movement control, timing, test chamber conditions, and procedural repeatability.
IEC 60695-2-11: Glow-Wire Flammability Test Method for End Products
IEC 60695-2-11 applies to end products. It is used when the test object is not just a standard material specimen, but a product, component, or assembly that needs to be evaluated under defined test conditions.
For end-product testing, fixture flexibility, specimen positioning, access to the test point, and observation of flame propagation are especially important.
IEC 60695-2-12: Glow Wire Flammability Index, GWFI
IEC 60695-2-12 is used to determine the Glow Wire Flammability Index, or GWFI, for materials. GWFI helps evaluate the highest temperature at which a material does not ignite, or if it ignites, self-extinguishes within the required time without total consumption or ignition of the wrapping tissue.
GWFI is commonly used for material selection and comparison before final product design.
IEC 60695-2-13: Glow Wire Ignition Temperature, GWIT
IEC 60695-2-13 is used to determine the Glow Wire Ignition Temperature, or GWIT, for materials. GWIT helps identify the temperature at which a material shows sustained ignition behavior under the defined glow-wire test conditions.
GWIT is useful when assessing the ignition risk of insulating materials exposed to abnormal heat.
GWFI vs GWIT vs GWEPT: What Is the Difference?
GWFI, GWIT, and GWEPT are often confused, but they serve different purposes.
GWFI focuses on material flammability performance. It helps determine the highest temperature at which the material does not ignite or self-extinguishes within the required time.
GWIT focuses on material ignition tendency. It helps determine the ignition temperature behavior of a material under glow-wire exposure.
GWEPT focuses on end-product testing. It evaluates how a finished product, component, or assembly behaves when exposed to the glow wire at a defined test point.
For material suppliers, GWFI and GWIT are usually more relevant. For product manufacturers and certification laboratories, GWEPT and end-product requirements may be more important.
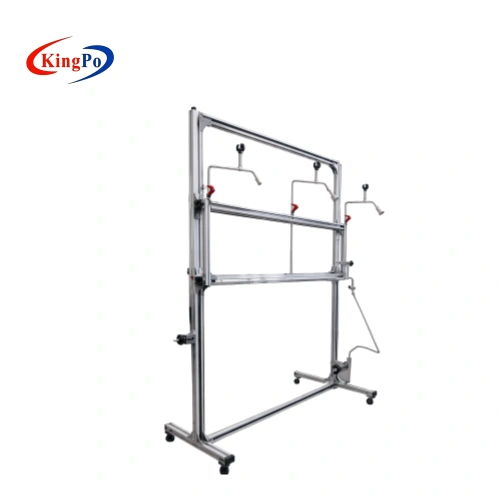
Which Glow Wire Test Apparatus Is Best for IEC 60695 Testing Labs?
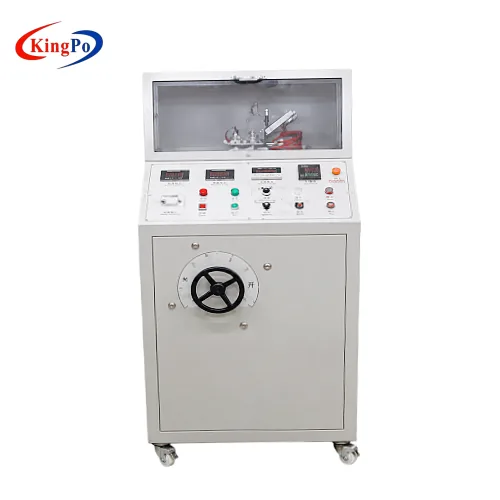
For laboratories performing IEC 60695 glow-wire testing, the best glow wire test apparatus is not simply the most expensive model. The right apparatus is the one that can provide stable temperature control, accurate force application, repeatable specimen movement, precise timing, clear observation, safe operation, and reliable documentation.
For certification laboratories, semi-automatic or automatic glow wire test apparatus is usually preferred because it reduces operator influence and improves repeatability.
For manufacturer quality control laboratories, the apparatus should be easy to operate, stable, and suitable for routine inspection of insulating materials, plastic parts, connectors, switches, housings, and electrical components.
For R&D laboratories, fixture flexibility and adjustable test programs are especially valuable because different product structures, specimen shapes, and materials may need to be evaluated before certification.
Recommended Glow Wire Apparatus Configuration by Laboratory Type
|
Laboratory Need |
Recommended Configuration |
Why It Matters |
|
Third-party testing laboratory |
Semi-automatic or automatic glow wire test apparatus with stable temperature control, accurate force control, timing accuracy, data recording, and calibration support |
Helps reduce operator influence and supports repeatable IEC 60695 testing |
|
Manufacturer quality control lab |
Standard-compliant glow wire tester with reliable temperature control, contact force, specimen holder, flame observation, and safety protection |
Suitable for routine inspection of plastic parts, insulating materials, and electrical components |
|
R&D laboratory |
Flexible glow wire test system with adjustable fixtures, specimen holders, and optional customized test programs |
Helps evaluate material selection, product structure, and design improvement before certification |
|
Certification-oriented laboratory |
High-repeatability apparatus with controlled movement, traceable calibration, documentation support, and safety enclosure |
Supports audit-ready testing and consistent laboratory workflow |
|
Production inspection lab |
Easy-to-operate apparatus with stable test parameters and repeatable setup |
Helps improve daily testing efficiency and reduce training difficulty |
Manufacturer Selection Note: Testing Bodies Are Not Equipment Manufacturers
When selecting a glow wire test apparatus, laboratories should distinguish between testing laboratories, certification bodies, and equipment manufacturers.
Organizations such as UL, TÜV, SGS, Intertek, and other third-party laboratories may perform, witness, or certify tests related to IEC 60695 requirements. However, the apparatus itself should be selected from an equipment manufacturer capable of providing standard-oriented design, fixture support, calibration documentation, technical guidance, and after-sales service.
A professional equipment supplier should help the laboratory confirm the applicable standard, specimen type, required temperature range, contact force, movement speed, penetration depth, timing resolution, chamber size, ventilation, automation level, and documentation requirements.
Key Requirements for a Reliable Glow Wire Test Apparatus
Stable Glow Wire Temperature Control
Temperature stability is one of the most important factors in glow wire testing. The apparatus must heat the glow wire to the required test temperature and maintain stable thermal conditions before contact with the specimen.
Typical glow wire test temperatures are often within the range of 550°C to 960°C, depending on the applicable product or material standard. A reliable apparatus should provide a sufficient temperature range, stable control, and calibration support.
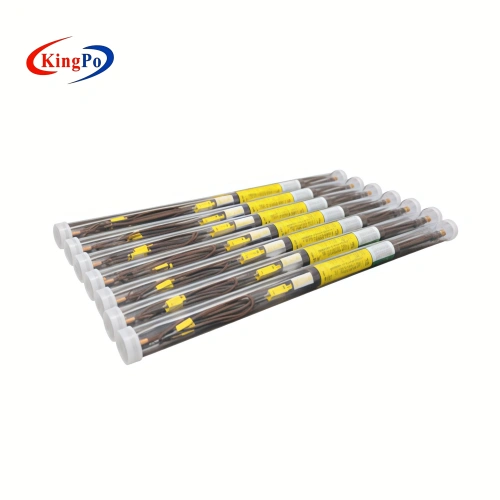
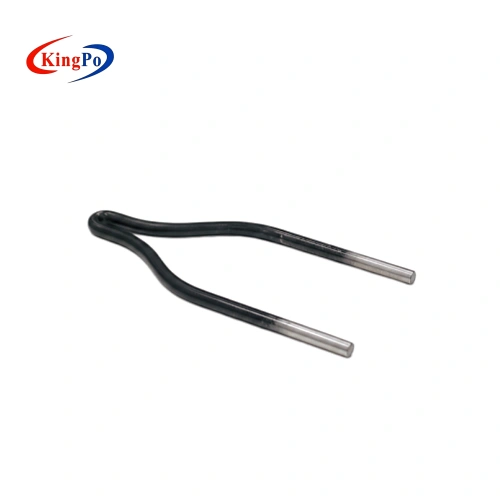
Standardized Glow Wire Construction
The glow wire is usually made from nickel-chromium material and must conform to the required geometry and dimensions. The shape and condition of the glow wire affect contact, heat transfer, and repeatability.
Laboratories should inspect the glow wire regularly and replace it when wear, oxidation, deformation, or calibration deviation affects performance.
Accurate Contact Force
The force between the glow wire and the specimen must be controlled. A commonly referenced contact force is 0.95 N ± 0.10 N. If the force is too high, the specimen may be mechanically damaged or overheated. If the force is too low, heat transfer may be insufficient and results may not be repeatable.
Controlled Specimen Movement and Penetration Depth
The apparatus should control how the specimen approaches the glow wire or how the glow wire contacts the specimen. Movement speed and penetration depth influence the consistency of the test.
A controlled mechanism helps maintain repeatability between operators, specimens, and test batches.
Precise Timing
Glow wire testing requires accurate timing for the application period, ignition time, flame duration, and extinguishing time. A timing resolution suitable for IEC 60695-related testing helps laboratories record consistent data.
Automatic timing and data recording can reduce manual errors, especially in laboratories performing frequent tests.
Clear Observation of Ignition and Flame Behavior
Operators need a clear view of the specimen during the test. The apparatus should allow observation of ignition, flame spread, afterglow, dripping, deformation, and whether the wrapping tissue ignites.
Good chamber lighting and an observation window help improve result interpretation.
Safety Protection and Exhaust
Glow wire testing can produce heat, smoke, fumes, flame, and molten material. A safe apparatus should include an enclosed chamber, observation window, exhaust support, and operator protection features.
The testing area should be ventilated and kept away from strong drafts that could affect flame behavior.
Calibration and Documentation Support
Reliable test results depend on regular verification of temperature, force, timing, and movement-related parameters. Laboratories should maintain calibration records, maintenance logs, and test reports to support audits, internal quality systems, and customer review.
Manual vs Semi-Automatic vs Automatic Glow Wire Test Apparatus
A manual glow wire tester may be suitable for occasional internal checks or basic screening where the laboratory has experienced operators and limited testing volume. However, manual operation may introduce variation in specimen positioning, contact timing, observation, and data recording.
A semi-automatic glow wire apparatus improves repeatability by controlling key actions such as specimen movement, timing, and return after test completion. This configuration is suitable for many manufacturer quality control labs and pre-compliance laboratories.
An automatic glow wire test apparatus is usually better for certification-oriented laboratories, high-volume testing, and laboratories that require stronger traceability. Automation helps standardize movement, timing, data recording, and operator workflow.
For laboratories preparing for audits or third-party testing, the recommended choice is usually a semi-automatic or automatic system with controlled movement, accurate force application, stable temperature control, timing functions, safety enclosure, and calibration documentation.
How to Prepare for a Glow Wire Test
Before testing, laboratories should confirm the applicable standard, test purpose, specimen type, required test temperature, conditioning requirements, and pass/fail criteria.
The specimen should be prepared according to the relevant standard. Material specimens are often conditioned under controlled temperature and humidity before testing to reduce variation caused by moisture content or environmental exposure.
The apparatus should be checked before the test. Operators should verify that the glow wire, thermocouple, specimen holder, contact force mechanism, timing device, exhaust system, observation window, and emergency stop are in proper condition.
The laboratory should also confirm that the test area is clean, ventilated, and free from strong air currents.
Basic Glow Wire Test Procedure
First, the operator prepares and conditions the specimen according to the applicable test method.
Second, the glow wire apparatus is inspected and calibrated as required by the laboratory’s quality system.
Third, the glow wire is heated to the specified test temperature and allowed to stabilize.
Fourth, the specimen is positioned correctly and brought into contact with the glow wire under the required force and application time.
Fifth, the operator observes ignition, flame duration, afterglow, dripping, specimen damage, and whether the wrapping tissue below the specimen ignites.
Finally, the operator records test parameters, observations, pass/fail result, calibration status, environmental conditions, and any abnormal events.
How to Interpret Glow Wire Test Results
A glow wire test result should not be judged only by whether a visible flame appears. Laboratories should record the complete behavior of the specimen.
Important observations include whether ignition occurs, time to ignition, flame duration, afterglow time, whether the specimen self-extinguishes, whether molten drops occur, whether wrapping tissue ignites, and whether the specimen is totally consumed.
For GWFI testing, the focus is on material flammability behavior and self-extinguishing performance.
For GWIT testing, the focus is on ignition behavior and sustained flaming.
For end-product testing, the focus is whether the finished product has limited ability to ignite or propagate flame under defined test conditions.
The exact pass/fail judgment should always follow the applicable IEC standard and the relevant product safety standard.
Common Mistakes in Glow Wire Testing
One common mistake is testing without proper sample conditioning. Moisture, storage condition, and specimen preparation can influence ignition and flame behavior.
Another common mistake is starting the test before the glow wire temperature has stabilized. Temperature instability can lead to inconsistent results.
Incorrect contact force is also a major source of error. If the applied force is outside the required range, the test may not represent the intended condition.
Poor specimen positioning can affect heat transfer and flame observation. The specimen should be fixed securely and positioned according to the applicable standard.
Residue on the glow wire or specimen holder can also affect repeatability. Cleaning and inspection should be part of the routine laboratory workflow.
Incomplete documentation is another frequent problem. Without test conditions, calibration status, observations, and photos or videos where applicable, the result may be difficult to defend during audits or customer review.
Glow Wire Test vs Needle Flame Test vs UL 94
The glow wire test simulates abnormal heat from a solid heated element, such as an overheated electrical part. It is highly relevant for electrical insulating materials, components, and end products where internal overheating may occur.
The needle flame test simulates the effect of a small open flame. It is often used to evaluate localized flame exposure caused by fault conditions.
UL 94 evaluates the burning behavior of plastic materials under horizontal or vertical flame exposure. It is widely used for material classification, especially in markets where UL requirements are important.
These tests are not interchangeable. A laboratory should select the correct method based on the product standard, material application, and fire hazard scenario being evaluated.
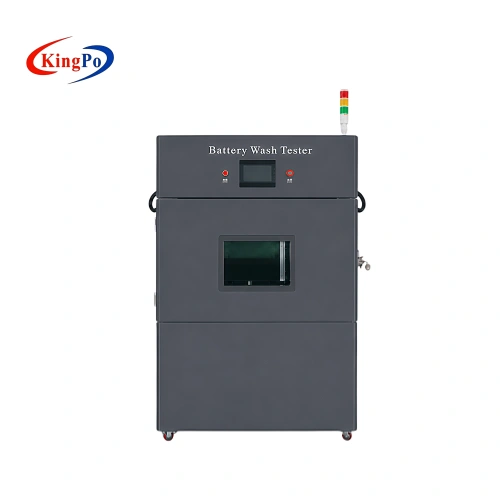
Why Choose KingPo Glow Wire Test Apparatus?
KingPo Glow Wire Test Apparatus is designed for laboratories that need repeatable glow-wire testing according to IEC 60695 series requirements. It supports fire hazard assessment for insulating materials, electrical components, household appliances, lighting products, connectors, terminal blocks, plastic enclosures, and other electrical or electronic equipment.
The system is designed with controlled temperature, standardized contact force, specimen movement control, timing functions, observation support, and an enclosed chamber for safer operation.
KingPo can help customers confirm the appropriate configuration based on specimen type, applicable IEC sub-standard, test temperature, automation preference, documentation needs, and laboratory workflow.
For laboratories that need not only a tester but also technical support for setup, operation, calibration planning, and compliance documentation, KingPo provides practical engineering guidance before and after equipment delivery.
Suggested internal link anchor text: IEC 60695-2-10 Glow Wire Tester
What Information Should You Provide Before Requesting a Quotation?
To recommend the correct glow wire test apparatus configuration, the supplier should understand the laboratory’s actual testing needs. Before requesting a quotation, prepare the following information:
Applicable standard, such as IEC 60695-2-10, IEC 60695-2-11, IEC 60695-2-12, IEC 60695-2-13, or related product standards.
Test object, such as raw material, insulating sheet, molded plastic part, connector, switch, household appliance component, lighting product, or finished product.
Required test temperature range and typical test points.
Preferred operation mode, such as manual, semi-automatic, or automatic.
Specimen size, shape, thickness, and fixture requirements.
Data recording and reporting requirements.
Calibration, inspection, and audit documentation requirements.
Laboratory power supply, ventilation, installation space, and exhaust conditions.
FAQ
What is the purpose of the glow wire test?
The glow wire test is used to evaluate whether electrical insulating materials, components, or end products can resist ignition or limit flame propagation when exposed to abnormal heat. It simulates short-term thermal stress that may occur when an electrical component overheats, fails, or transfers heat to surrounding material.
Which IEC standard defines the glow wire test apparatus?
IEC 60695-2-10 defines the glow-wire apparatus and common test procedure. It is the foundation for the related glow-wire test methods used for end products and materials. Laboratories should also check IEC 60695-2-11, IEC 60695-2-12, and IEC 60695-2-13 depending on the test purpose.
What is the difference between IEC 60695-2-10 and IEC 60695-2-11?
IEC 60695-2-10 focuses on the common apparatus and test procedure. IEC 60695-2-11 focuses on the glow-wire flammability test method for end products. If a laboratory is evaluating a finished product or component assembly, IEC 60695-2-11 may be more directly relevant to the test application.
What is GWFI?
GWFI means Glow Wire Flammability Index. It is used to evaluate the flammability behavior of a material under glow-wire test conditions. It helps determine the highest temperature at which the material does not ignite, or if it ignites, self-extinguishes within the required time without unacceptable burning behavior.
What is GWIT?
GWIT means Glow Wire Ignition Temperature. It is used to evaluate the ignition tendency of a material under glow-wire exposure. It helps determine the temperature at which sustained ignition occurs according to the defined test method.
What temperature is used for glow wire testing?
The required glow wire temperature depends on the applicable material or product standard. Typical test temperatures are often within the range of 550°C to 960°C. A laboratory should always confirm the required test temperature from the relevant IEC standard or product safety standard.
Why is contact force important in glow wire testing?
Contact force affects heat transfer between the glow wire and the specimen. If the force is too high or too low, the result may not be repeatable or compliant with the intended test method. A reliable apparatus should control the contact force accurately and consistently.
Is automatic glow wire testing better than manual testing?
Automatic or semi-automatic testing is usually better for laboratories that need repeatability, frequent testing, audit-ready documentation, and reduced operator influence. Manual testing may be acceptable for basic screening or occasional checks, but it can introduce more variation in timing, positioning, and observation.
Can one glow wire tester perform GWFI, GWIT, and end-product testing?
A properly configured glow wire test apparatus can support different IEC 60695 glow-wire test applications, but the fixture, specimen positioning, test procedure, and reporting requirements may vary. The laboratory should confirm whether the configuration supports the intended material or end-product test method.
What should laboratories check before buying a glow wire test apparatus?
Laboratories should check the applicable standard, temperature range, glow wire construction, thermocouple type, contact force, penetration depth, specimen movement, timing resolution, chamber volume, observation window, exhaust design, automation level, calibration support, and documentation requirements.
Does glow wire testing replace UL 94 testing?
No. Glow wire testing and UL 94 testing evaluate different fire hazard scenarios. Glow wire testing simulates abnormal heat from a heated solid element inside electrical products. UL 94 evaluates the burning behavior of plastic materials under flame exposure. The correct test depends on the product standard and application risk.
How can laboratories improve repeatability in glow wire testing?
Repeatability can be improved by proper sample conditioning, stable temperature control, accurate force application, correct specimen positioning, controlled movement, clean glow wire condition, draft-free test environment, trained operators, calibrated instruments, and complete documentation.
Technical Inquiry and Configuration Support
Need help choosing the right glow wire test apparatus for IEC 60695 testing? Contact KingPo with your applicable standard, specimen type, required temperature range, automation preference, calibration needs, and laboratory workflow. Our engineering team can recommend a suitable configuration for material testing, end-product testing, quality control, R&D, or certification-oriented laboratory applications.