To conduct IK Rating Testing Technology and Application Based on KINGPO IK01‑06 Spring Impact Hammer, I begin by preparing the test sample and ensuring the equipment is set up correctly. Utilizing IK Rating Testing Technology and Application Based on KINGPO IK01‑06 Spring Impact Hammer is essential for accurately assessing the durability and safety of electrical enclosures. For instance, achieving higher IK ratings, such as IK10, demonstrates enhanced product lifespan but may also increase manufacturing costs. By applying the proper impact energy levels and performing repeated impacts with the IK Rating Testing Technology and Application Based on KINGPO IK01‑06 Spring Impact Hammer, I can ensure reliable and consistent results. Adhering to these procedures helps certify products that comply with safety standards and boosts their acceptance in the market.
Key Takeaways
-
IK ratings measure how well products resist mechanical impacts, ensuring safety and durability.
-
Use the KINGPO IK01‑06 hammer for precise and repeatable impact testing across various IK ratings.
-
Prepare test samples by cleaning and securely mounting them to ensure accurate results.
-
Perform repeated impacts on each exposed face of the enclosure to assess its durability.
-
Document all test results carefully, including measurements and observed damage, for certification purposes.
-
Follow safety precautions, such as wearing protective gear and inspecting equipment before testing.
-
Regularly calibrate testing equipment to maintain accuracy and reliability in results.
-
Understand the pass/fail criteria for IK ratings to ensure compliance with safety standards.
IK Rating Testing Overview
What Is IK Rating?
I often encounter the term ik when I test electrical enclosures. The ik rating measures how well a product resists mechanical impacts. According to the IEC 62262 standard, ik ratings provide a numeric classification for the degrees of protection offered by enclosures against external mechanical impacts. I rely on this standard to ensure consistent results during ip and ik protection testing. The table below summarizes the official definitions and classifications:
|
Definition/Classification |
Description |
|---|---|
|
IK Rating |
Numeric classification for protection against external mechanical impacts. |
|
Impact Resistance |
Degree of protection, indicated by two numbers for levels of protection. |
|
Testing Specifications |
Specifies mounting, atmospheric conditions, number of impacts (5), and hammer design. |
When I prepare for ip and ik protection testing, I make sure enclosures are clean and in new condition. I mount them on a rigid support with minimal displacement. I distribute five impacts evenly across each exposed face. This process helps me determine the correct ik ratings for product certification.
Why IK Ratings Matter
I believe ik ratings play a crucial role in product safety. High ik ratings prevent damage in many industries. For example, agricultural machinery relies on ik protection to avoid heavy impacts from tools and debris. Construction machinery needs ik ratings to withstand falling objects and accidental impacts. Material handling equipment benefits from ik protection by enduring collisions and mechanical stress. Defense systems depend on ik ratings for reliability under extreme conditions. These impact protection ratings help maintain uninterrupted operation and prevent costly interruptions.
Tip: I always check the ik rating before recommending a product for harsh environments. This step ensures product safety and meets certification requirements.
I use ip and ik protection testing to verify the durability of enclosures. The ingress protection rating and ik ratings together provide a complete picture of a product’s ability to resist both dust, water, and mechanical impacts. I find that combining these ratings improves product safety and supports product certification.
IK Certification Basics
I follow a strict certification process when I test for ik ratings. The certification process starts with preparing the sample and setting up the testing equipment. I perform repeated impacts and record the results. I compare the outcomes to the certification requirements outlined in IEC 62262. If the enclosure meets the required ik ratings, I document the findings for product certification.
I know that accurate ip and ik protection testing is essential for product safety and certification. I always ensure the testing environment meets the standards. I check the mounting, atmospheric conditions, and hammer specifications. I keep detailed records throughout the certification process. This practice helps me achieve reliable product certification and supports compliance with impact protection ratings.
IK Rating Testing Technology and Application
KINGPO IK01‑06 Hammer Features
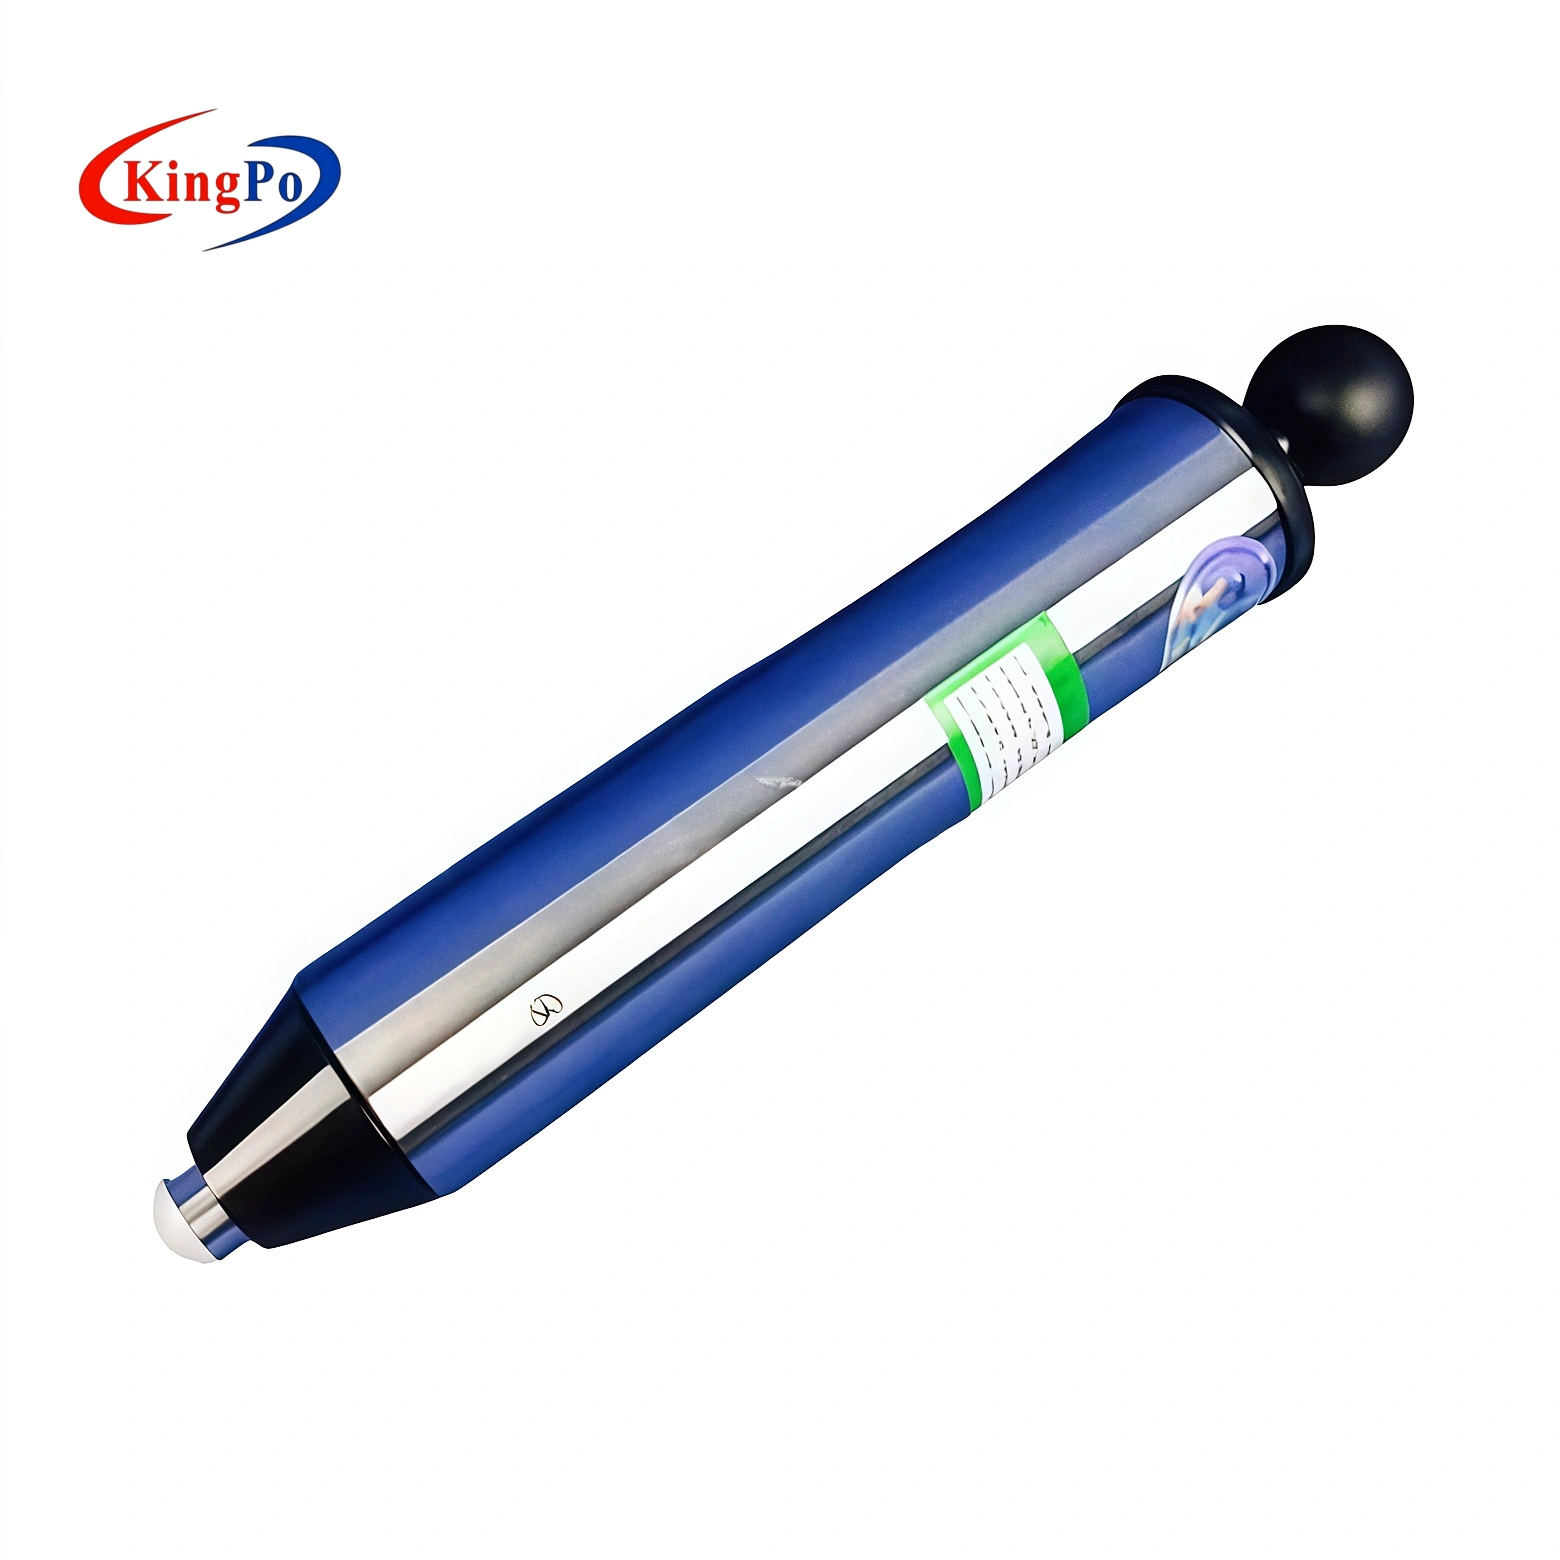
I rely on ik rating testing technology and application based on kingpo ik01‑06 spring impact hammer for accurate impact protection assessments. The hammer stands out because of its advanced spring drive system. This system delivers high precision and repeatability, which means I can trust the results every time I test. I find it easy to switch between different IK ratings without changing the hammer, which saves time and reduces errors. The hammer meets international standards, so I know my tests align with global requirements. Durability matters to me, and the hammer uses strong materials that last. It also comes with a calibrator, so I can maintain accuracy over long periods. Here is a summary of its features:
|
Feature |
Description |
|---|---|
|
High precision and repeatability |
The spring drive system minimizes impact energy deviation, ensuring consistent test results that meet specific standards. |
|
High adaptability and convenience |
Allows quick switching between six IK ratings without needing to change the hammer, making it user-friendly for various testing environments. |
|
Full standard compatibility |
Complies with international standards for IK Rating Testing, which helps reduce testing costs for enterprises. |
|
Long-term stability and calibratability |
Made from durable materials for extended service life, and includes a calibrator to maintain accuracy over time, fulfilling metrology requirements. |
Note: I always check the calibrator before starting any impact protection test to ensure reliable results.
Impact Energy Levels (IK01-IK06)
When I perform ik rating testing technology and application based on kingpo ik01‑06 spring impact hammer, I select the correct impact energy for each rating. The hammer lets me adjust the energy output to match the required IK level. Each rating corresponds to a specific energy value measured in joules. This precision helps me simulate real-world impact scenarios and verify the protection level of enclosures. Here is a table showing the energy values for each IK rating:
|
IK Rating |
Impact Energy (Joules) |
|---|---|
|
IK01 |
0.14 |
|
IK02 |
0.20 |
|
IK03 |
0.35 |
|
IK04 |
0.50 |
|
IK05 |
0.70 |
|
IK06 |
1.00 |

I use repeated impacts to test the durability and protection of each sample. The hammer’s spring drive system ensures that every impact delivers the correct energy, which improves repeatability and reliability. I follow standards like IEC 60068‑2‑75:2014 to maintain consistency.
Application in Electrical Enclosures
I apply ik rating testing technology and application based on kingpo ik01‑06 spring impact hammer to many real-world situations. Electrical enclosures need strong impact protection to survive harsh environments. I test LED lighting, household appliances, and consumer electronics. Office equipment like keyboards, mice, routers, and printers often require IK ratings from IK01 to IK04. Industrial control systems and sensors also benefit from impact protection testing. I use the hammer to check the mechanical strength of enclosures and operating levers. Reliable impact energy output helps me ensure that products meet safety standards and perform well in demanding conditions.
Tip: I recommend regular impact protection tests for products used in industrial and commercial settings to maintain reliability.
I see ik rating testing technology and application based on kingpo ik01‑06 spring impact hammer as essential for verifying impact protection and energy resistance in electrical enclosures. Accurate impact energy and repeated impacts help me certify products for safe use in various applications.
Preparing for IK Testing

Required Equipment
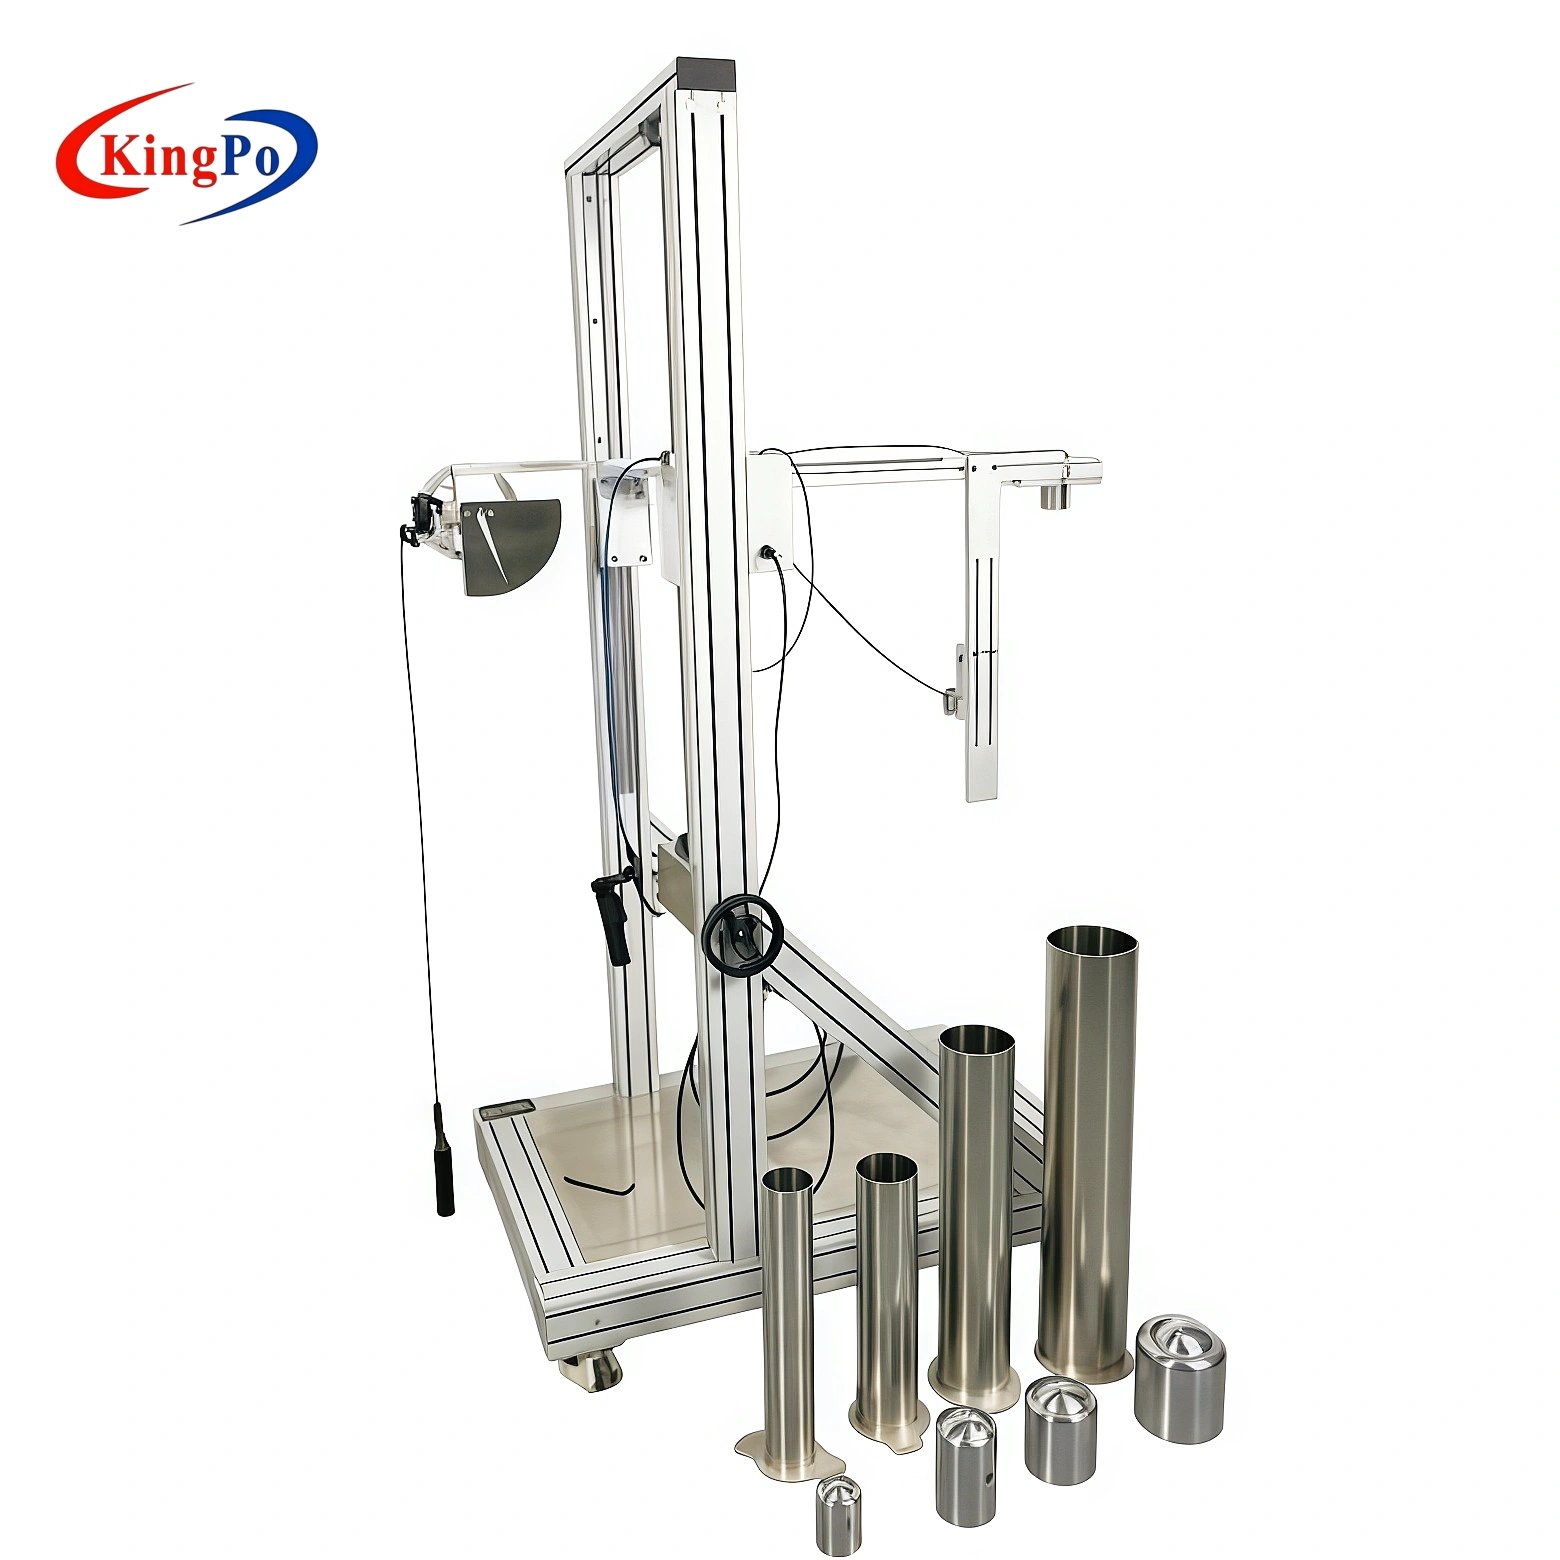
Before I start any IK rating test, I gather all the necessary equipment. I always check that I have the right tools for accurate protection testing. According to IEC 62262 standards, I use the following items:
-
Spring impact hammer (KINGPO IK01‑06)
-
Vertical hammer impact tester
KINGPO IK01‑06 Hammer
I rely on the KINGPO IK01‑06 spring impact hammer for most protection tests. This tool gives me precise control over the energy delivered to the test sample. I can adjust the hammer to match the required protection level. The spring mechanism ensures each impact is consistent. I find this important for reliable safety results. The hammer’s design makes it easy to handle and reduces user fatigue during repeated tests.
Test Samples and Fixtures
I prepare the test samples by cleaning them and checking for any defects. I use fixtures to hold the samples in place. Proper mounting prevents movement during testing. This step helps me measure true protection and not just the strength of the mounting. I always select fixtures that match the size and shape of the sample. This practice improves the accuracy of my protection tests.
Measurement Tools
I use measurement tools to record the results of each test. These tools include calipers, rulers, and sometimes digital force gauges. I measure any dents, cracks, or deformations after each impact. Accurate measurements help me judge the level of protection and safety. I keep detailed records for every test to support certification.
Test Environment Setup
Controlled Conditions
I set up the test area to control temperature, humidity, and lighting. Stable conditions ensure that protection results are not affected by outside factors. I avoid drafts and direct sunlight. I check that the room meets the requirements for safety and repeatability. This step helps me get consistent protection data.
Mounting and Surface
I mount the test sample on a rigid, flat surface. The mounting must not absorb energy or move during the test. I use clamps or brackets to secure the sample. The surface must be strong enough to resist the impact without bending. This setup allows me to measure the true impact resistance of the sample. I always check the mounting before each test for safety.
Safety Precautions
Safety is my top priority during protection testing. I wear safety glasses and gloves to protect myself from flying debris. I keep my hands and face away from the impact area. I make sure the test area is clear of other people. I inspect the hammer and fixtures before each use. If I see any damage, I replace the tool. I follow all safety rules to prevent accidents and ensure reliable protection results.
Tip: I always review the safety checklist before starting any impact-resistant test. This habit keeps me focused on both safety and component protection.
I believe that choosing ik protection for each product depends on its use and environment. I look for energy-absorbing materials and designs that improve impact protection. Careful preparation and attention to safety help me achieve accurate and repeatable results.
IK Testing Procedure

Sample Preparation
I start the testing process by preparing the sample. I inspect the enclosure for any visible defects or contamination. I clean the surface to remove dust and debris. I check the mounting points and make sure the enclosure fits securely in the fixture. I use a rigid support that allows a displacement of 0.1 mm or less. This step is critical because a stable mounting ensures accurate impact results. I verify that the sample is in new condition and free from previous damage. I document the sample’s dimensions and material before beginning the testing process.
Tip: I always double-check the mounting to avoid errors during the testing process.
Setting Up the Hammer
I set up the KINGPO IK01‑06 spring impact hammer according to the testing process requirements. I select the appropriate hammer head for the desired impact energy level. I calibrate the hammer using the included calibrator. I adjust the spring mechanism to match the IK rating needed for the testing process. I position the hammer perpendicular to the surface of the sample. I make sure the hammer is stable and ready for repeated impacts. I review the settings and confirm that the hammer aligns with IEC 62262 and IEC 60068-2-75 standards.
Note: I always check the hammer’s calibration before every testing process to maintain accuracy.
Performing the Impact Test
Selecting Impact Level
I select the impact level based on the IK rating required for the testing process. I refer to the table of impact energy values for IK01 to IK06. I adjust the hammer’s spring tension to deliver the correct impact energy. I confirm the settings before starting the testing process. I ensure the hammer is ready to deliver consistent impacts for the testing process.
Three Repeated Impacts
I perform the testing process by applying three repeated impacts to each exposed face of the enclosure. I distribute the impacts evenly across the surface. I avoid placing more than three impacts near the same point. I follow the process outlined in IEC 60068-2-75 to ensure compliance. I record the location of each impact during the testing process. I observe the sample after each impact and note any visible changes. I repeat the process for all exposed faces of the enclosure.
Callout: I always limit the number of impacts near the same point to prevent skewed results during the testing process.
I find that following this process helps me achieve reliable and repeatable results. I maintain detailed records throughout the testing process to support certification and product safety.
Recording Results
I always treat recording results as a critical step in IK rating testing. Accurate documentation helps me track every impact and ensures transparency for certification. After I finish the impact tests, I inspect the sample closely. I look for dents, cracks, or any deformation. I use calipers and rulers to measure the size and depth of any damage. I write down these measurements right away so I do not miss any detail.
I organize my findings in a clear table. This method lets me compare results across different samples and impact levels. Here is an example of how I record the results:
|
Impact Location |
Impact Energy (J) |
Number of Impacts |
Observed Damage |
Measurement (mm) |
Pass/Fail |
|---|---|---|---|---|---|
|
Top Face |
0.50 |
3 |
Small dent |
1.2 |
Pass |
|
Side Panel |
0.70 |
3 |
Crack |
2.5 |
Fail |
|
Bottom Edge |
1.00 |
3 |
No damage |
0 |
Pass |
I make sure to record the exact location of each impact. I note the energy level used and the number of impacts. I describe the damage in simple terms. I measure the affected area and decide if the sample passes or fails based on the standards.
Tip: I always double-check my measurements and notes before finalizing the report. This habit prevents mistakes and supports reliable certification.
I keep a log of every test. I include the date, equipment used, and calibration status. I attach photos of the sample before and after testing. I store all records in a secure folder for future reference. This practice helps me answer questions from auditors or clients.
I follow the IEC 62262 standard for reporting. I document the equipment setup, energy levels, and impact procedure. I list the controlled impacts and describe the damage assessment. I repeat the tests at different locations and energy levels for a thorough evaluation. I maintain detailed records for each sample to ensure transparency.
I believe that careful recording of results builds trust in the testing process. It shows that I follow strict procedures and deliver accurate assessments. My documentation supports product certification and helps manufacturers improve their designs.
Interpreting IK Ratings and Certification
Pass/Fail Criteria
I always start by checking the official pass/fail criteria for IK rating tests. The IEC 62262 standard defines clear requirements for each rating. I look for visible damage after impact, such as cracks or deformation. If the enclosure shows no significant damage, it passes the test. I use the following table to compare the protection levels for each rating:
|
IK Rating |
Protection |
Impact |
|---|---|---|
|
IK00 |
Not Protected |
– |
|
IK01 |
Protected against 0.14 joules impact |
0.25 kg mass falling from 56 mm |
|
IK02 |
Protected against 0.2 joules impact |
0.25 kg mass falling from 80 mm |
|
IK03 |
Protected against 0.35 joules impact |
0.25 kg mass falling from 140 mm |
|
IK04 |
Protected against 0.5 joules impact |
0.25 kg mass falling from 200 mm |
|
IK05 |
Protected against 0.7 joules impact |
0.25 kg mass falling from 280 mm |
|
IK06 |
Protected against 1 joules impact |
0.25 kg mass falling from 400 mm |
|
IK07 |
Protected against 2 joules impact |
0.50 kg mass falling from 56 mm |
|
IK08 |
Protected against 5 joules impact |
1.70 kg mass falling from 300 mm |
|
IK09 |
Protected against 10 joules impact |
5 kg mass falling from 200 mm |
|
IK10 |
Protected against 20 joules impact |
5 kg mass falling from 400 mm |
Tip: I always inspect the enclosure after each impact and compare the results to the table above. This step helps me decide if the sample meets the required protection level for certification.
Comparing to IK Standards
I compare my test results to the IEC 62262 standards. I check if the enclosure withstands the specified impact energy for its rating. I use the chart below to visualize the protection levels for different ratings:

I find that higher ratings mean stronger protection. For example, IK10 offers resistance to 20 joules of impact. I always match the test conditions to the standard, including mass, height, and number of impacts. If the enclosure passes all criteria, I mark it as compliant. I use these comparisons to guide my certification decisions.
Note: I never skip the step of matching my results to the official standards. This practice ensures my certification process stays accurate and reliable.
Documentation for Certification
I treat documentation as a crucial part of the certification process. I record every detail, including test conditions, impact locations, and observed damage. I organize my notes in tables and attach photos of the tested samples. I include calibration records for the hammer and measurement tools. I write a summary of the results and state whether the enclosure meets the required ratings.
I submit my documentation to the certification body. I keep copies for future reference. I know that thorough records support product certification and help manufacturers improve their designs. I always follow the guidelines for certification reporting. This habit builds trust with clients and auditors.
Callout: I recommend keeping all certification records organized and accessible. Good documentation speeds up the certification process and prevents confusion.
I believe that understanding pass/fail criteria, comparing results to standards, and maintaining clear documentation are essential steps for successful certification. I rely on these practices to deliver accurate ratings and reliable certification for every product I test.
Troubleshooting and Best Practices
Common Testing Issues
When I perform IK rating testing, I sometimes face recurring challenges. I see weak materials fail to withstand impacts, which leads to cracks or dents. Thin films on screens often do not provide enough protection. I also notice that poor enclosure design can focus energy on one spot, causing damage. To address these issues, I use strong impact-resistant materials. I increase the thickness of the screen’s film when possible. I design enclosures to deflect impacts or spread energy across a larger area. These steps help me improve both durability and safety.
Tip: I always review the enclosure design before testing to spot weak points that could affect safety.
Ensuring Accurate Results
I know that accuracy in testing is essential for product safety and certification. I follow strict quality control measures to avoid errors. I use standardized equipment that meets international standards. I keep the testing environment stable, controlling temperature and air pressure. I make sure to test every part of the enclosure, not just the most obvious spots. I disconnect power from the device to prevent electrical accidents and ensure safety during testing.
Here is a table that summarizes my main quality control measures:
|
Quality Control Measure |
Description |
|---|---|
|
Standardized Testing Equipment |
Use equipment that meets established standards to ensure consistency in testing results. |
|
Controlled Testing Conditions |
Maintain specific environmental conditions (temperature, air pressure) during testing. |
|
Comprehensive Testing of Product Enclosures |
Ensure that all parts of the product are tested to verify overall durability and safety. |
I always test at temperatures between 15°C and 35°C. I keep air pressure between 86 kPa and 106 kPa. I only test lights when they are fully assembled and installed. These steps help me achieve reliable results and maintain safety.
Maintenance and Calibration
I understand that regular maintenance and calibration of my equipment are vital for accurate testing and long-term safety. I inspect the KINGPO IK01‑06 spring impact hammer before each use. I look for signs of wear or damage. I clean the hammer and fixtures to remove dust or debris that could affect results. I calibrate the hammer regularly using the proper calibrator. This routine keeps my testing precise and supports safety in every assessment.
Note: I schedule calibration checks at set intervals to avoid unexpected errors during testing.
I believe that careful troubleshooting, strict quality control, and regular maintenance help me deliver trustworthy testing results. These best practices protect both users and products by ensuring the highest level of safety.
I always follow a clear process for IK rating testing with the KINGPO IK01‑06 hammer. I value high precision and repeatability, which help me achieve consistent certification results. The hammer’s adaptability and standard compatibility make certification easier for every project. I know that long-term stability and calibratability support ongoing certification accuracy. I never skip safety steps or documentation, as these actions protect users and support certification. If I ignore proper procedures, I risk safety hazards, product failures, and certification delays. I recommend exploring advanced guides for more certification tips and troubleshooting. I trust this approach for reliable certification every time. I always check my certification records and review certification standards before each test. I keep my certification logs organized and up to date. I believe that strong certification practices build trust with clients. I use the KINGPO IK01‑06 hammer for every certification project. I always compare my certification results to international standards. I update my certification process as new regulations appear. I share my certification experience with my team. I encourage others to follow strict certification guidelines. I always look for new certification resources to improve my skills.
FAQ
How often should I calibrate the KINGPO IK01‑06 hammer?
I check calibration before every test. I schedule full calibration every three months. Regular calibration keeps my results accurate and reliable.
Can I use the KINGPO IK01‑06 hammer for IK07 or higher ratings?
I use the KINGPO IK01‑06 hammer for IK01 to IK06 only. For IK07 or higher, I select a different hammer designed for those energy levels.
What should I do if the sample moves during testing?
I stop the test and remount the sample. Secure mounting prevents errors. I always check the fixture before starting each test.
Do I need special training to perform IK rating tests?
I recommend basic training on the hammer and IEC standards. I learned the process quickly with hands-on practice and clear instructions.
How do I record results for certification?
I use tables to organize impact locations, energy levels, and damage. I attach photos and calibration records. Clear documentation supports certification.
What safety gear do I need during testing?
I wear safety glasses and gloves. I keep the test area clear. I inspect tools before use. Safety gear protects me from flying debris.